Welcome to A Crafter's Corner! I love to create crafty projects, and would love to share some of my creations with you! If you are interested in scrapbooking, stamping, or cross stitch, these are the venues I use most often. Enjoy your visit!
Showing posts with label CTMH. Show all posts

Monday, May 21, 2018

Playing with Paper

I used to show a lot of paper crafts on my blog, and I have enjoyed my stitching so much lately, I haven't shared anything else. I have been doing something other than cross stitch though!  Although it has been a week, I am excited to show the card I made my mom for Mother's Day this year.


This is a card in a box. I have admired so many of these on Pinterest over the years. I made one last year for my father in law's 80th birthday, I just never shared it.  I made a card like this for my mother in law this year also, and I forgot to take any pictures before she took it home with her.  For my mom's card, I used a handful of die cut pieces that have been sitting in my stash a long time, I don't even know where they came from.  The cardstock and printed paper are from Close To My Heart, from an old collection called Heart of Winter.


The purple in the flowers really pop against this beige! The card I made for my mother in law had pink flowers, her favorite color.  Both moms have always loved to work in their flower beds, this was so appropriate.

I am happy I could send my mom some flowers this year that would not die and be thrown away within a few days.

I used a lot of dimensional adhesive between the flowers and leaves, to ensure the bouquet had the depth I wanted.

My mom was as thrilled receiving this, as I was when I sent it.  Have you ever tried one of these cards? It was very quick and easy to make, I expect I will make more in the future. Maybe a fishing one for Father's Day!

Thanks for stopping by, have a wonderful day.

Wednesday, September 11, 2013

Pages, as Promised!

So, maybe I didn't get this posted over the weekend, but at least I didn't wait a full week! Yes, I finally found the time to take a couple of really lousy pictures of the latest scrapbook pages, hoorah! It makes me feel like I'm starting to have a life again (insert smile)


This first layout is Close To My Heart's new Sarita paper. I created these pages for my group that meets every month. These were the August pages. The colors are soooooo bold on these papers! Lots of pink, purple, dark blue, just so many colors to pull out of the patterned paper! I used the layout instructions that came with the Sarita Workshops on the go kit, but I changed up the papers a little bit from the suggested ones. Personally, I like to have just a little bit of pattern with more solid cardstock for emphasis. For me, too many patterns takes the focus away from the photos.


The next layout is one I did this past weekend, for our 4H group, the Happy Scrappers


This club is a mix of seasoned scrappers, and people just beginning. I didn't want to overwhelm the new girls, and I didn't want to bore the others. I chose what I love, simple elegance! This is the new Huntington paper from Close To My Heart. These colors are wonderful for fall. I love that there is fall paper, without pumpkins and trick or treat. My kids are too old for that, and I know others are in the same boat too, so these flowers were perfect.  I'm not sure if you can read it, the embellishment says "Give Thanks For All You Have".  I hate to put a title on pages I demonstrate, because I want people to actually use the pages. I also included a small label on the left side, made from our Cricut Art Philosophy cartridge. I am starting to use the Cricut cartridges more and more.

I'm so glad I was able to share these pages with you, thanks for stopping by to see them! I've got a gorgeous card I received, that I will be sharing later this week, hope you'll come back to check it out. Thanks for stopping by!

Thursday, August 8, 2013

Crossing My Fingers!

I hope I can get this post in, before I lose my internet! We're brewing up quite a storm here in central Indiana, some much needed rain. But with the good, comes the bad-when it storms out in the country, the internet doesn't last long, so I've got to make this quick!

I promised to share some of my excuses for my absence. Excuse number 1:


The books are finally gone from my library. I spent what seemed like forever reviewing, studying, testing with a tutor, until finally, I have passed my state licensing, and have officially transitioned from an LPN to RN. I found the cutest keychain on Etsy that I just had to buy myself to celebrate! I didn't realize how much of my time I was spending on studying, and now I wonder how did I ever get anything else done! Now I am out looking for the perfect job. I think I've found it, so I'm keeping my fingers crossed.

Excuse #2


I'm allowing myself some much needed time for paper therapy! I've probably spent more time cleaning out and organizing my papers than anything else, but I have completed a couple of layouts. I totally cased this layout from another consultant, but it was perfect for these race pictures of my son. I've had this Victory paper pack from Close To My Heart for several months, and this is the first layout I've completed. Using flip flaps that attach directly to the outside of the page protector, I was able to have 15 pictures and some hidden journaling on this layout. Here is a picture of the open flip flaps, revealing more photos:


And although this hasn't taken up much of my time, YET, I just have to share:


I recently received this wonderful RAK from my friend Vickie. This has got to be the cutest pincushion! I don't know how she does such tiny stitches, but the pictures just don't do this justice. With the handmade counting pins, this is perfect. There was also a LHN pattern that I am anxious to get started on. I love, love, love LHN, and this will be my next start-thank you Vickie!

Time to say goodbye-my service is starting to fade in and out-but my new blackberry bushes are getting watered, so I'm happy happy! Thanks for stopping by.

Wednesday, July 10, 2013

Studio J

It seems there's always so many things that need to be done.  Like right now, the grass needs cut, but we had to get the mower repaired first. It's tough being an adult sometimes, deciding to do the necessary things, even if it means not getting to play as much.

On one of my sleepless nights lately, I decided to play! I have so many pictures that are just waiting to be organized, or printed even! My husband pointed out last week, over 18,000 photos on my computer,  that's a lot of memories that I haven't backed up! This particular sleepless night, we had multiple guests visiting, so I couldn't just go in my craft room, and start turning on lights and making noise. I wanted to create, but had to be quiet. I pulled out my trusty laptop, and in the dark living room, I was able to complete several layouts from start to finish, using the Studio J online scrapbooking from Close To My Heart. Take a peek at some of my work!


These were photos from Mother's Day this year. I love using the Studio J scrapbooking. Using this software, I can scrap my pictures in record time, using any retired paper that I may not even have in my stash! Ever paper has design elements to use, such as stickers and embellishments, that you can customize to your own preference.  Even if you aren't computer savvy, which I am definitely not, Studio J has many videos for instructions on the basics. Here's another project


I love old fashioned scrapbooking with paper, scissors and glue, but sometimes, getting the photos off the computer is well worth the change! When printed, these pages are 12 x 12, photo quality, ready to go in my books. With all of these layouts, I simply dragged my pictures across, and dropped them in a photo well. You can alter the paper colors, but these worked for me just the way they were.

Eight pages completed, in one sleepless night, not bad! This weekend, I was invited to go to an all day crop. I've already ordered pictures to be printed, and I'm going to pull together some coordinating papers. I'm going to challenge myself to see if I can get eight pages scrapped the traditional way, wish me luck!

Thanks for stopping by, have a great day

Sunday, July 7, 2013

Freebies to Share!

Last week, while I was on vacation, Close To My Heart  held their annual convention for consultants in Disneyworld. I always enjoyed being at convention with my friends, and sharing the excitement when new products are released. Of course, the most exciting moment is seeing the new Idea Book!


As always, the book doesn't disappoint, there are many new and exciting products. This fall, there's even a new Cricut cartridge, called Artbooking!


Close To My Heart already has two exclusive cartridges, the Art Philosophy, and the Artiste. As is our standard, the cartridge comes with three stamp sets, and three sheets of chipboard Dimensional Elements that coordinate with the images on the cartridge. This is really a bargain for the price!

If you'd like to get your own copy of the brand new Idea Book, let me know! I can get one in the mail to you this week, and you'll have plenty of time to drool over it before the new items are available August 1st. You can purchase your book via the Idea Book tab on the right sidebar.

While waiting for your new book, you can enjoy some Close To My Heart freebies! Starting this month, Close To My Heart will be releasing free artwork to download, including colorful gift tags, notepaper, home decor, and more! You'll find "Rediscover" ads in Creating Keepsakes, Paper Crafts, and Scrapbook & Cards Today magazines telling you where to find your freebies, as well as here on my blog! This month is a sheet of 8 tags, with the words "You Make Me Happy."  The tags are several different colors, so you have many options.

I wanted to try these tags for myself, but I didn't have much time. I pulled out my CTMH Originals card making idea book, and put together a very quick card:


I'm anxious to try a few more fun ideas with these tags. By clicking on the "Rediscover" link on my right sidebar, you can download your own set of free tags.

Happy Crafting!

Tuesday, May 21, 2013

Creative Packaging

Good morning my friends! I have a fun little package I created that I'd like to show you. I made this container with my customers last month, and I've been very negligent about sharing it with you all.


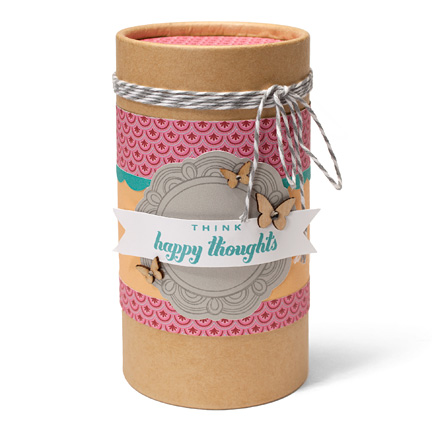
This is called a Kraft container, by Close To My Heart. It is similar to a shipping tube, made of sturdy cardboard. I used paper from the Lucy paper pack, with stamps from the current Buzz & Bumble workshops on the go kit. Usually, it is difficult to get paper to adhere to round items. I used tombow adhesive, and had no problems having the paper stick this time.

As you can see, the container opens at the top, which makes it a creative gift package. I was able to get this tube of heel repair cream into the container, with some paper shred. I put the Kraft container and these little socks into a gift bag, and shipped it to mom for Mother's day. If you have problems with cracked heels, like mom and I do, these socks are wonderful! They have some type of gel inside them. I only put them on at night, which is perfect, because I get cold feet at night! When I wake up in the morning, my heels are so much softer, they are wonderful. These can be picked up at Walmart.


 Close To My Heart is teaming up with Big Picture Classes to bring you a live webcast with step-by-step instructions for making your own kraft container, "Happy Thoughts". 


The FREE webcast will air Thursday, May 30 from 7:00 pm to 8:00 pm (MDT). During the presentation, you’ll learn to make several projects from a variety of sponsors, including Close To My Heart’s Happy Thoughts kraft container, as the presenter walks you through the steps. Watch the Pajama Party by yourself, or with your friends for a fun crafting pajama party. Anyone with an Internet connection can watch, so be sure to order your project supplies in advance and then tune in!
The Pajama Party class will be available for FREE atBigPictureClasses.com on May 30. If you would like to interact on the message board, participate in live chat, post to the gallery, download handouts, or enter any contests, you will need to log in to the Pajama Party “classroom” by creating a free account on the Big Picture Classes website.
To make the Happy Thoughts kraft container, you and will want to have the following items—or similar products—on hand:
  • My Acrylix® Frame Flair Stamp Set (D1546)
  • My Acrylix® Happy Thoughts Stamp Set (C1536)
  • Chantilly Paper Packet (need 1 sheet of B&T, X7163B)
  • Crème Brulee Cardstock (need 1 sheet, X5754)
  • Lagoon Cardstock (need 1 sheet, X5762)
  • White Daisy Cardstock (need 1 sheet, 1385)
  • Whisper Cardstock (need 1 sheet, X5929)
  • Whisper Exclusive Inks® Pad (Z2172)
  • Lagoon Exclusive Inks® Pad (Z2195)
  • My Creations® Kraft Container (Z1833)
  • Baker’s Twine Neutral Assortment (need 3 yards, Z1701)
  • Color-Ready Trinkets Wooden Shapes (Z1844)
  • Sparkles Black & Grey Assortment (Z1754)
  • 3-D Foam Tape (Z1151)
  • Micro-Tip Scissors (Z534)
  • Corner Rounder (Z578)
  • Paper Trimmer (Z1783)
  • My Acrylix® Spritz Cleaner (1778)
  • My Acrylix® Stamp Scrubber (Z1782)
  • 2" × 3½" My Acrylix® Block (Y1009)
  • 4" × 5" My Acrylix® Block (Y1012)
  • Cricut® Art Philosophy Collection (Z1686)
You can order these items from my website, just click on the link on my sidebar.


Thanks for stopping by friends, have a great day!

Thursday, April 18, 2013

Sending Hugs

I don't know about you, but when I open my mailbox, I get a lot of paper, but nothing I really enjoy receiving. It seems everybody stays in touch with technology these days, and sometimes it's depressing.  Isn't it fun to find a letter, or a cute card once in a while? This past week, I made a real effort to send out a few random cards, instead of an email. This is probably one of my absolute favorite cards I've ever made:


The colors are so soft, and the picture really doesn't do it justice. I sent this to my mom this week. I know she gets lonely, and I don't get down to Texas to see her often enough. I know she'll love this when she gets it.

Another fun card I sent this week was this:


I can't take credit for making this card. I received it in a swap with some other Close To My Heart consultants a couple of years ago. Unfortunately, I don't remember who made this, so I cannot give her credit. The peacock is embossed with white, so this has a nice texture to it. And although you can't see in the picture, there are tiny pearls attached here and there. I sent this to my new penpal Jenny, from themodestpeacock.blogspot.com. I hope she'll enjoy this cute card!

I have such a stash of cards, just waiting to be mailed out. If you'd like to receive a random piece of happy mail once in a while, I'd love to send you some! Drop me an email with your snail mail address, and I'd love to share a smile. Thanks for stopping by, have a wonderful day!

Monday, April 8, 2013

Pretty in Pink

It seems I've fallen a little behind sharing any of the cards that I've made lately. Yesterday I sorted through a basket of over one hundred handmade cards. I won't post them all today I promise! I'll only share one, and then I think I'll go put a couple of the spring ones out in today's mail.

I love the way this card turned out. The pink is soft enough to be subtle, the black and the sparkles add just enough pizazz.


Of the large supply of cards I have, it seems this is the only sympathy card left in my stash, which I hope won't get used any time soon.

It's raining here in Indiana today, I think it'll be a good day to play in my craft room. Thanks for stopping by, have a wonderful day!

Tuesday, March 26, 2013

A Little Bunny

I have a wonderful group of customers that I get together with faithfully. For the last 5 years, these girls have come to my house on a Friday night, once a month to share our love of papercrafting. This is the part of my Close To My Heart business that I look forward to the most! We take turns providing a meal, and we enjoy each other's company. They are more like the sisters I never had, than customers. 

This past Friday was our night. I design a scrapbook layout that everybody assembles together, as well as another small project, usually a card. With Easter so close, I wanted something other than a card. Digging through my boxes of creative stash, I found Chinese take-out boxes that were calling out to be used, I've stored them way too long. With a little inspiration from another consultant, and a little bit of tweaking, we created bunny boxes:


Several of the girls have little grandchildren, so the boxes are perfect to put some little surprises in. Isn't he just the cutest! You can't see it, but he even has a fluffy cotton tail on the back! As it turned out, I had just enough boxes for the girls to each have one, not one left for myself. This is actually the one that Pam created. I'll just have to enjoy the little bunny in pictures!

Thanks for stopping by, have a great day!

Tuesday, February 5, 2013

Lots to Share!

Good morning my blogging friends! I have been too busy to post this past week, and I have missed sharing with you all! I think that is a pre-cursor to the way I may be for the next month, a little hit or miss. With my clinical test date quickly approaching, I am spending more time with my books, less time with my computer. A necessary evil for now, hoping it's a temporary thing!

First thing I'd like to share is a thank you! This weekend I received a wonderful package from Tricia at The Stampers Stitches. She had a giveaway on her blog, a chart she wished to pass along. Not only did I receive the Shepherd's Bush chart, she also send floss and the cutest handmade card!


If I had the supplies on hand, I probably would have started this pattern this weekend. Good excuse to do some shopping! Isn't this the cutest card too! As a cardmaker myself, I know the time and love that goes into these, and I love, love, love receiving handmade cards! Thank you so much Tricia for this happy mail.

Next to share is my work in progress, Joy in the Journey. I was moving along quite well on this piece, when I found a mistake!
At the bottom on the right side, there is a flower on a stem, just above the heart. I had one too many stitches on the stem! This caused all of the outer green row to be out one stitch too far. Of course, I found it when I got to the stop of the piece, and it wasn't lining up. I pulled out the flower, but I couldn't decide if I wanted to pull out all of the green row, or somehow adjust my stitching to make it work. I got so frustrated and put it down. Instead of working this out, I started another piece! Which I also made a counting error in it, and quickly put it down. Had a little bit of the flu this week, and I'm going to blame my mistakes on that! I haven't stitched in several days now and it's driving me crazy! So, what do you all suggest, pull out the green edging, or make it work?

I decided to turn my attention to my scrapbooking since the stitching wasn't going well! My customers have been so wonderful, encouraging me to amp up my business, and they are helping me along! One customer put my name out through her friends, to be a vendor at a local event in February. Another customer has booked me to host a scrapbook retreat in Terre Haute this summer! I am excited about both opportunities, but the timing is scary due to my school obligations. I know that I am blessed to have so many positive things happening, so I am not complaining! I have one group of customers that comes to my house every month to scrapbook, so I have to start getting ready for that. I designed the pages we will be creating that night. This is the first time I have played with paper since making Christmas gifts, and it was so relaxing. This is what my girls will be making


I apologize for the less than perfect pictures. My good camera wasn't working, and had to use the camera on my phone. These papers are from the Close To My Heart Clementine pack. I usually make the bare bones layout, and encourage the girls to add their own embellishment flare. Some like to add a lot of sparkle and bling, and to some, the flowers added now are too much. For myself, I would only add a title and call it done. We all have our own tastes. For me, I love the blue and brown, but overall, this pack is a little feminine. Having all boys, I'm not sure I can come up with pictures to add on here. I have a pile of layouts that are too feminine for my boys. Maybe I can sell some of them at the vendor event this month.

Well friends, that covers quite a bit for today! Thanks for stopping by, hope you have a wonderful day!

Wednesday, January 9, 2013

Bracket Frame

I have a couple of Christmas gifts I was able to put together this past year, that I haven't posted on here yet, so it's about time to get them shared! I can get at least one of them up today, need to locate pics of the others.
I have a neighbor that always gives the most wonderful handmade gifts for Christmas. I have, on occasion, been able to give a handmade gift back, 2012 was one of those lucky years. I had so much fun assembling this frame for her. Monica is a scrapbooker like myself, and she has a lot of photos displayed around her house and craft room, so I knew that was the perfect gift for her.


Monica has only one child, a daughter, and I thought this would be so pretty with a picture of her little girl in it. With the other bracket frame I assembled, I covered the front of the bracket with paper, this one I left white. I cut out the large flowers with my nestabilities and cuttlebug. I used four layers of papers to make the flowers. The smaller flowers were created with my Close To My Heart cricut Art Philosophy cartridge. The leaves and stems were also on the cricut cartridge. The background paper is from a retired paper pack, Girls Just Wanna Have Fun, accented with Hollyhock and Desert Sand cardstocks. I love the way this turned out, I was as excited as she was when she opened it! These bracket frames are so easy to assemble, I'm anxious to create a few more!
That's all for today, thanks for stopping by!

Monday, December 10, 2012

CTMH Avonlea Bracket Frame

Even though it doesn't look like it outside, and the temps don't exactly show it, it's beginning to look and feel like Christmas around here! It took me a while to get the tree put up and finished, but that is done, and the stockings are hung. And I've been busy making Christmas cards and a few Christmas presents. I have one gift that I am extremely excited about completing, and I have been anxiously trying to share it on here! When I went to Close To My Heart's annual convention in July, I won a bag full of new products, including the display tray, My Creations star, and the My Creations bracket frame. It has taken me until now to finally assemble the bracket frame, but I think it was worth the wait.


This was created with the Avonlea paper pack from CTMH. I love the way the brown on the outside of the frame, brings out the little bit of brown on the interior paper! This frame was created at the St Louis training this fall, but Colonial White paper was used on the outside, instead of the Chocolate paper. I think I prefer my version a little bit more. The rosettes on the bottom corner were created with the CTMH Art Philosophy cartridge. The alphabet at the bottom is the Houndstooth alphabet, sponged with Slate ink to bring out the pattern. I wish this wasn't being retired in the spring, but maybe that means something even better is in the new idea book! Bakers twine and sparkles complete the look. With the "Together" sentiment, I envision adding a family picture, a newly married couple, or even 3 generations of family that get together every Christmas. I can't wait to see what picture my friend puts in this frame! I have another one of these dimensional frames that I'm going to finish as a gift, and I'm thinking I'm going to use paper from the Stella paper pack. I have it all worked out in my head, just need to squeeze in the time to complete it. I need to finish the wooden crosses I am embellishing with the Roxie paper pack, then I'll get back to these frames. Thanks for stopping by, have a great day!

Saturday, November 3, 2012

Mojo Monday 265

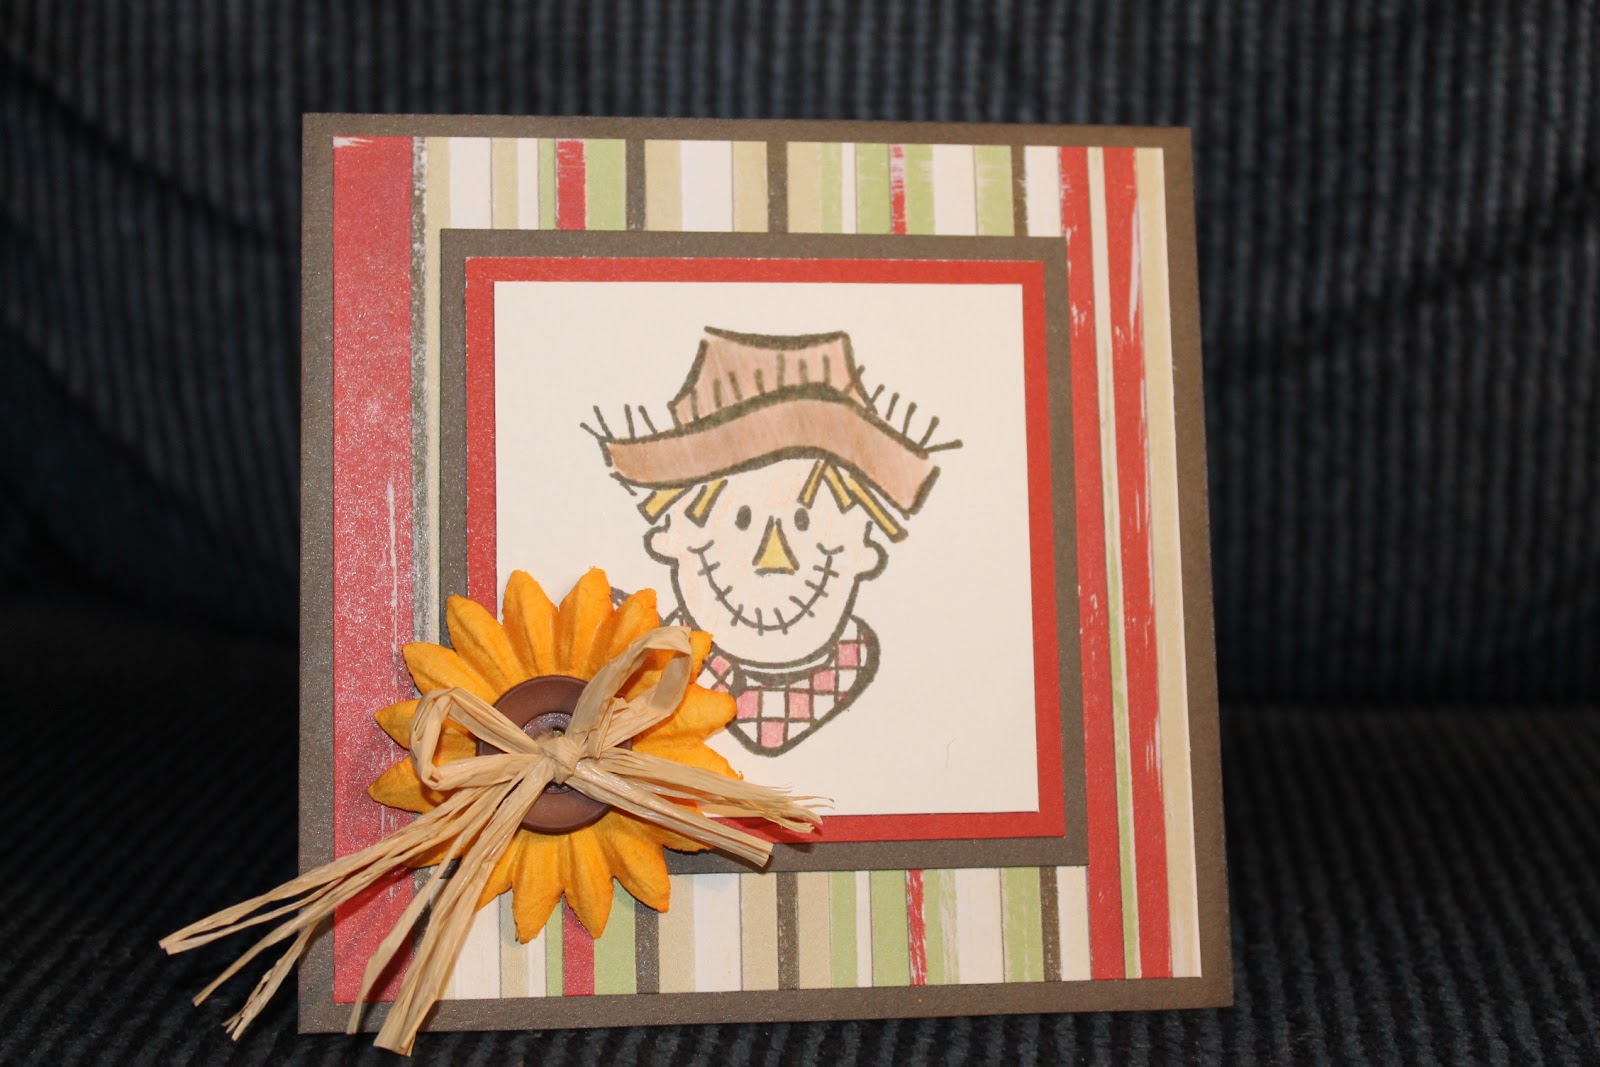
I am on a creative roll today! I didn't even get started on the fall banner I was considering, but I did manage a card with this week's Mojo Monday sketch instead, yeah! When I was digging through old wooden stamps for my Halloween banner this morning, I found an old Close To My heart set with a scarecrow, a crow, and the saying "Hay there".  Here's the card I came up with:


Digging through my stash of papers, I found this striped paper from a pack called Cocoa Cafe from Close To My Heart. I added Cocoa and Cranberry cardstocks to complete this square card.  To finish the fall feeling, a sunflower with a button in the center, tied with a bit of raffia. I can't wait to put this in the mail this week, I think he's so cute! Thanks for stopping by!

Halloween Banner Finished

I started making a Halloween banner back in September, thinking I could add it to my mantle this year. I just finished it this morning, a little late to enjoy it this year. At least I'm a step ahead for next Halloween! I cut all of the banner pieces with the Cricut Artiste cartridge. I actually had a scarecrow in the center panel of this, may be why I never finished it. I knew the scarecrow wasn't what I was going for, just couldn't quite pull it all together. Check out my little witch in the center


I added pop dots under the bat and the stars around the witch to add some dimension.  I masked the moon, and sponged yellow and orange around it.


I added an image with pop dots on every section of the banner for a little depth. I did all of my coloring with watercolor pencils and blending pen. Once I got going, I was so anxious to get this little project onto my finished list! All products are Close To My Heart, some this year's, some from days gone by. I even pulled out some old wooden blocks for this! Let me know what you think. I'm so happy to have a rainy day today, and happy to be playing. Maybe I'll start on a fall banner! Have a great day


Thursday, October 25, 2012

Mojo Monday

Even though it is far from Monday, I have finally completed a card for the sketch for Mojo Monday! Maybe I need to title my posts Mojo Thursday, as that is usually the day I can finally get around to creating. This week, I see there are a a lot of participants with this sketch:


I didn't follow exactly, but pretty close, which I think is the whole idea behind a sketch!


Once again, digging into my stash of old papers. These papers are from a Close To My Heart special years ago, called Cocoa Cafe. I gave a handful of these sheets away last night, and still have quite a bit left over. I love the little bit of Amethyst on the stripe. I offset the square intentionally to be able to see the Amethyst below. The stamp set is also from CTMH, called Fashionista. This card came together so quickly, I just love it! If you have any questions, please let me know, thanks for visiting!

Thursday, October 18, 2012

Pear & Partridge Card, Mojo Monday Style

Welcome to another version of my Mojo Monday! This week, sketch #263 was probably one of my favorite ones. I really like the addition of the little tab on the right side.  Here's this week's Mojo Monday sketch:


See what I mean, isn't this cute! I used double sided Pear and Partridge paper from Close To My Heart. This is the Christmas paper pack this year:

I used cocoa cardstock for my base, and cranberry cardstock behind the printed paper. I used a CTMH Dimensional Elements Booksmart for my tab, which I had to cut off on the right side.  The beige ribbon is from the Pear and Partridge Workshops on the Go card kit. I used the CTMH October Stamp of the Month, Very Merry Christmas for my stamped words. I'm excited to have another Christmas card already made! Thanks for stopping by!

Wednesday, October 17, 2012

Halloween's Coming!

For some reason, I always love decorating for Halloween. I don't do a lot of scary decorations, but I love anything with witches, ghosts and most definitely pumpkins. Maybe it's because I know that with Halloween, comes with colder temperatures. And unlike many people, I love it when it's cold outside! Last year, to add to my Halloween decor, I made a 12x12 shadowbox with Halloween images. This year, I used My Creations cubes from Close To My Heart, to make a perpetual calendar. Every side of the cube has a different number, and they can be turned to change the date.


I used stamps and paper from the Moonlight Workshops on the Go. Since I had little pieces left from an old Close To My Heart paper kit, I added those in too. I sponged the numbers with Goldrush ink. I also embellished these cubes with black and gray sparkles. These will look great with my other Halloween creations! Here's another side of the cubes:


These were very simple to create. If you have any questions on them, or would like to order the supplies, let me know. Thanks for stopping by!

Thursday, October 11, 2012

Feeling Flirty!

Today is the first time I've had a chance to sit and play with Close To My Heart's new Flirty paper pack. I've had it for a while, but I've been completing so many layouts lately, and the colors and prints in this paper pack are not ones that usually fit with the pictures of the men in my family, so I haven't really dug in. I see myself using this pack mostly for cards. I finally created a card with the Mojo Monday sketch this week. Here's the sketch:
 I love the little banners on this. Once I sat down, my card came together so quickly:
I don't think my lighting was optimal for this shot, but I really liked the card. I added New England Ivy cardstock, as well as a retired CTMH color, Golden Ember for the banners. A little hint of burlap ribbon and a button tied with hemp completed the look. Maybe I'll stick this in the mail to my son and his new wife, I can relate to the situation they are in, as history has  a way of repeating itself. I can remember what it was like for me as a newlywed, unable to be with my husband because I was in college in one city, while the Army had him serving somewhere else. My son is currently stationed in one city, while his new bride finishes law school in another.  They have learned to make the most of their time together, and I am so happy for them.
Thanks for stopping by to see what I've created, have a great day!

Wednesday, October 10, 2012

Getting things done!

Well, my family all left me alone in the house last night. Of course, I could have spent my time doing a lot of studying, which I feel like I have neglected lately. But, instead, I took advantage of uninterrupted time at my scrapbook table! I have had a pile of layouts started, and last night I actually completed 5 layouts! This is such an accomplishment for me, I was thrilled! I also worked on a Halloween project that I will show later this week, using new CTMH supplies. Check out these layouts-


These photos are all from 2008, my boys look so young! It feels so good just to be able to finish these. I am loving the LOAD Challenge over at Let's Scrap, I am getting so much done! The goal is to complete 31 projects this month. With the pages I completed last night, I am already at 18, I think that's already a record for me in one month! I will attempt to get the others posted later today. Thanks for stopping by, have a great day!

Saturday, September 29, 2012

CTMH Dakota Barn Star

It's been a great week here. My oldest son Chris, from the photo in my last post, has been home for a visit. I didn't get very much crafting done while he was here, but we got some fun family photos, that I will probably share at some point! In the meantime, I am excited to share the barn star that I created using the CTMH Dakota paper pack!


I used the new Whisper cardstock for the background behind the paisley print. The rosette and the banner were created with cuts from the new Cricut Artiste cartridge. In the center, I added a pewter embellishment. I love the way this turned out, it even matches the colors in my house! Thanks for looking, have a great day!